How to adjust the redzones and capturepoint areas
This is the first part of a series where we look closer at the structure of a gamemode bundle. People ask how they can edit the redzone / out of bounds area, how to move flags, adjust spawns, etc.
Well as I said this is the first part so we will start with something easy. We will adjust the redzones of the US and RU team for Metro CQ. So this is something that might work for almost all maps and gamemodes but we will also look in another tutorial on how to do this from scratch in order to create completely new gamemodes. Take note that this is something we are currently working on, so we didn‘t figure out everything yet. Anyways at this point we want to start with the adjustment of the out of bounds areas. To adjust these zones we need to have an idea on what to look for.
So we go now on Venice-Ebx and look for the Levels folder. Then we look for the map where we want to take action for. Here you might notice that we only see the map ID’s and you don’t know which map is the one you are looking for. Well for this we have a page in the docs where you get the names of the maps. (Maps and gamemodes).
Now that you know the map, you want to choose the gamemode in that you want to change the areas. If it is conquest small then you will have to look for Conquest_Small_Logic or something like that. Just look for „Logic“ in it and it might be it. For some maps it is also separated in Ru and Us.
Now that you got the file you need to find out what and where the areas are.
I don‘t want to waste your time so what you are looking for is the VolumeVectorShapeData that has in most cases a bunch of arrays in it. You might notice that there are more then two of it.
This is because the capturepoint areas of the flags are also from that type. Just copy all of the guids and paste them in a txt file also save the partition guid that is on the top in the very first line.
If you just want to change the redzones go to webx.powback.com and go to the same path. You will see a connection like this:
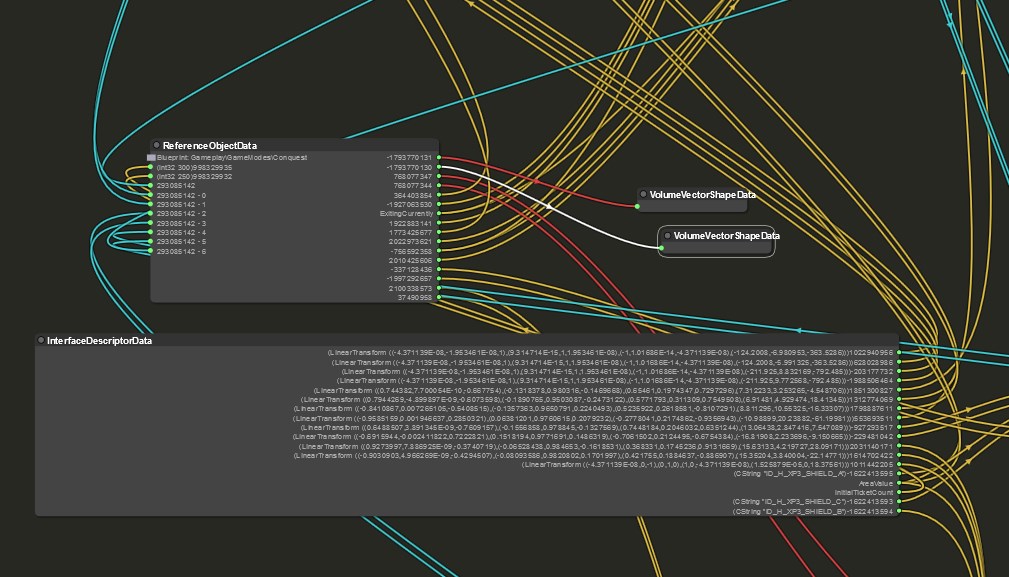
There is an InterfaceData that points to a ReferenceObjectData with the Blueprint Gameplay/Gamemodes/Conquest. And we have two VolumeVectorShapeData that are connected to it. These are our out of bound areas. If you click on it you will see the partitionGuid and the instanceGuid on the right side on top.
My txt file looks like this:
"Partition:
F5DE48B8-29ED-4E73-B040-82637BE0E81C

VolumeVectorShapeData of Metro:
3F42DFE6-3A5F-4539-8915-509AECF402B6
EBB54481-5D45-4FD7-A71C-0F6EC09F5716
5F0B827F-A3D1-406A-96D3-886C6AA089B9
081BC71A-E784-49FA-9BDA-02FC1354FE48
11119EDC-CD69-44A9-A5CC-DC7464A984AD
Now we are at a point where we have the information and need to use them to do an action. The best way to change the zones is to use the MapZoneHelper from @Janssent. It lets you see the areas ingame and adjust them. Don’t worry I show you now exactly how to use it.
I am running now a server with the MapZoneHelper and spawning ingame. I play on windowed mode so I can copy and paste the guids that are in my txt file. Also I entered vu.DesertingAllowed true in procon so I can go out of bounds.

So now I open the console and type in mapzonehelper.load <guid>. Now we can see the area we chose. If it is not the right one, try another one.
Fine, we see the area now but how do we adjust it? Simple, just look at a point of the area and press E now you can drag it. To drop it press E again or press F6 to create another point. You can also start from scratch, then you don’t need to enter a guid. Press E again to unselect and then press F4 to delete everything. Now just press F5 and start. When you are done you can press F3 to get the points as an array ready to copy and paste.
points = {
Vec3(-85.158966, 62.319305, -577.893494), Vec3(-93.307137, 68.938553, -68.152679),
Vec3(-104.542603, 69.044945, -73.314133), Vec3(-113.375511, 70.572624, -67.210930),
Vec3(-123.147675, 69.267685, -68.194618), Vec3(-146.439407, 72.191925, -59.349243),
Vec3(-127.768387, 69.345879, -74.832764), Vec3(-146.439407, 72.959145, -87.600159),
Vec3(-282.880432, 62.319305, -576.701538)
}
Just save them somewhere, now we will replace the old ones with them.
We create a new mod with a serversided file. I think I don’t need to explain the modstructure, as this is in the beginner guide. So let’s skip straight to the code we need. We have our guids and our points, now we use the ResourceManager to registeer the instance load handler for VolumeVectorShapeData. This is like an event but only for the one time that this specific instance gets loaded. We enter our guid there and get the instance. Then we make it writable and clear the array. And who would have thought it, now we just replace them. For that we need to iterate through it.That has to do with how frostbite handles it. Well basically that’s it. So this should look like this:
local cqLogicPartitionGuid = Guid('F5DE48B8-29ED-4E73-B040-82637BE0E81C')
local usRedzoneVectorData = ResourceManager:RegisterInstanceLoadHandler(cqLogicPartitionGuid, Guid('081BC71A-E784-49FA-9BDA-02FC1354FE48'), function(instance)
	instance = VolumeVectorShapeData(instance)
	instance:MakeWritable()
	instance.points:clear()

	local points = {
	Vec3(-85.158966, 62.319305, -577.893494), Vec3(-93.307137, 68.938553, -68.152679),
	Vec3(-104.542603, 69.044945, -73.314133), Vec3(-113.375511, 70.572624, -67.210930),
	Vec3(-123.147675, 69.267685, -68.194618), Vec3(-146.439407, 72.191925, -59.349243),
	Vec3(-127.768387, 69.345879, -74.832764), Vec3(-146.439407, 72.959145, -87.600159),
	Vec3(-282.880432, 62.319305, -576.701538)
	}

	for _,point in pairs(points) do
			instance.points:add(point)
	end
end)
I hope this was detailed enough for you. Now you have to test if it works. If you join this time, don’t forget to set vu.DesertingAllowed false.
So here is the proof:

I hope this was helpful for some of you. Have fun with it.
In the Next part we want to adjust the playerspawns.